This article shows a different approach to solving the same problem presented in the article AutoML pipeline for tabular data on VertexAI in Go. This time, instead of relying on AutoML we will define the model and the training job ourselves. This is a more advanced usage that allows the experienced machine learning practitioner to have full control on the pipeline from the model definition to the hardware to use for training and deploying.
At the end of the article, we will also see how to use the deployed model. All of this, in Go and with the help of Python and Docker for the custom training job definition. Let’s start.
Task & Prerequisites
Identically to the previous article, we are going to solve the problem of the prediction of the sleep efficiency for a given user, given a set of other attributes gathered during the day.
Working on Google Cloud requires giving the correct permissions to the user using it (our application). So creating a service account and getting a service file is the prerequisite to fulfill. I redirect you to the section Prerequisites: the project and the service file of the previous article.
Another prerequisite not covered in this article, because already explained in the previous one, is to have the CSV data uploaded on a bucket. Once again, I redirect you to the Data Storage section, where you can see how to create a bucket and upload data on it.
Note: For this different solution, there’s no need to sample rows of the CSV file to reach at least 1000 of them. So that part can be avoided.
Vertex AI Custom Training
There’s a well-done overview of custom training on Vertex AI in the official documentation: Custom training overview. That page clearly explains the different supports available for the different machine learning frameworks and for different workflows. Reading it is recommended to clearly understand the rest of the article.
So, the first thing to do is to solve the problem using any framework of choice. We decided to solve the task we decided to using TensorFlow Decision Forests](https://www.tensorflow.org/decision_forests). TensorFlow Decision Forests is mainly a Python library but it also has bindings for other languages; among them we find Go. However, the bindings are not available for training decision trees/forests but only for the inference of already trained models. For this reason, we need to use Python and define a custom training script (train.py).
Custom training - A cloud-based approach
The workflow followed by almost every machine learning practitioner is straightforward: load the data, train the model, evaluate it, export the model weights.
When working on the cloud we can’t do all these steps as we are used to. What we mean is that code that perfectly works locally where, for example, you just open a file and read its content can’t work as it is in a cloud-native setup. In fact, in this setup, we need to use the bucket as our “filesystem” and thus use the Google Cloud libraries to read and write files in the cloud.
Moreover, another thing to keep in mind is that every training script running in the Cloud sees a bunch of environment variables populated by the Cloud. Environment variables are the cloud way of configuring a running instance of a containerized application (and we are going to containerize our training script later).
Knowing what environment variables are available should be trivial, but we haven’t found a page containing them all. The 2 environment variables used in the training script have been found in 2 completely separated locations.
CLOUD_ML_PROJECT_ID: this variable contains the Google Cloud project that’s being used by the currently running instanceAIP_MODEL_DIR: this variable is passed to the container when a Custom Training Job (what we are doing) explicitly asks to pass it. It allows our Go application (that will instantiate a container for the training job) to choose from the outside of the container itself where to store the trained model.
All the cloud libraries are already designed to look for environment variables that are used to configure the client to authenticate to the cloud. As you will see, in the Python script we will never worry about the authentication/authorization of the various cloud clients. This is already automatically handled by the cloud libraries that are looking for variables like GOOGLE_APPLICATION_CREDENTIALS that, as the name suggests, will contain the location of the service file or the service file content.
When testing locally we need to worry about populating that variable. When the script is deployed on the cloud is the cloud itself that correctly populates all the variables related to the authorization/authentication of the application.
The cool thing about the cloud-based approach is that it forces us to structure our training script to be generic and self-contained. The container will execute our training script when started, so we can design our training script to accept command line parameters to configure its behavior.
The training script
The training script should be a properly designed CLI application. We should be able to configure:
- The data source location. The model should be trained to fetch data from a CSV uploaded on a bucket.
- The label. Since we are training a decision tree it’s trivial to change the target attribute, so it’s worth exposing it as a CLI parameter.
- The model destination. The path (as usual, on a bucket) where to store the trained model.
import os
import argparse

def parse_args():
    parser = argparse.ArgumentParser(description="Train a decision tree")
    parser.add_argument(
        "--data-location",
        help="The fullpath over GCP where to find the training data to use",
        required=True,
    )
    parser.add_argument(
        "--model-destination",
        help="The folder on GCP where to store the trained model",
        required=False,
        # AIP_MODEL_DIR
        # ref: https://cloud.google.com/vertex-ai/docs/reference/rest/v1/CustomJobSpec#FIELDS.base_output_directory
        # When this variable is used, the model uploaded becomes a Vertex AI model
        default=os.environ["AIP_MODEL_DIR"],
    )
    parser.add_argument("--label", help="The target variable to predict", required=True)
    return parser.parse_args()
As anticipated in the previous section the AIP_MODEL_DIR environment variable can be set by our Go application (while defining the Custom Job as we’ll see later). So we support both scenarios: if the user explicitly passes the CLI argument --model-destination we use that path, otherwise we fall back on the path set in the environment variable.
Defining the training script and saving the model as a saved model is trivial using TensorFlow Decision Forests (literally 3 LOC). The peculiarities of cloud training are - of course - all related to cloud storage and data processing.
The first thing to do is to verify if the user passed a data-location that’s on a bucket we can access from the current project.
from google.cloud import storage

args = parse_args()

project_id = os.environ["CLOUD_ML_PROJECT_ID"]
storage_client = storage.Client(project=project_id)

buckets = storage_client.list_buckets()
bucket = None
for buck in buckets:
    if buck.name in args.data_location:
        bucket = buck

if not bucket:
    print(
        f"Unable to find the bucket required by {args.data_location} among the buckets",
        file=sys.stderr,
    )
    return 1
The variable bucket now is a bucket object that we must use to interact with the files it contains. So, reading the CSV file is trivial, we just need to pass the relative path (to the bucket root) of the CSV to the blob method, to get a “blob”. We can think about a blob as a file path. Using pandas we can read the csv file a file pointer and check if the user specified a correct feature as the label.
import pandas as pd

file_name = args.data_location.replace(f"gs://{bucket.name}/", "")
blob = bucket.blob(file_name)
with blob.open("r") as file_pointer:
    dataset = pd.read_csv(file_pointer)

features = dataset.columns
if args.label not in features:
    print(
        f"Label {args.label} not found among the features of {args.data_location}",
        file=sys.stderr,
    )
    return 1
Now that we have a dataset in pandas format, we want to convert it to a tf.data.Dataset object that’s the optimized way for feeding data to a TF-DF model.
There’s some feature selection (removal) to do because if we are interested in predicting sleep efficiency, we of course want to remove all the features that are already connected to the sleep itself (the idea is to predict the sleep efficiency given the activities performed during the day, and not predicting the efficiency given the sleep attributes themselves). Dropping other features that are useless (like the date or the ID) is another good idea.
import tensorflow_decision_forests as tfdf

potential_labels = {
    "MinutesAfterWakeup",
    "MinutesAsleep",
    "MinutesAwake",
    "MinutesToFallAsleep",
    "TimeInBed",
    "LightSleepMinutes",
    "LightSleepCount",
    "DeepSleepMinutes",
    "DeepSleepCount",
    "RemSleepMinutes",
    "RemSleepCount",
    "WakeSleepMinutes",
    "WakeSleepCount",
    "SleepDuration",
    # default label
    "SleepEfficiency",
}
if args.label not in potential_labels:
    print(
        f"\"{args.label}\" not found among the supported labels: {','.join(potential_labels)}",
        file=sys.stderr,
    )
    return 1

# remove the real label from the potential labels
potential_labels = potential_labels - {args.label}

# Remove all the rows with an invalid label (may happen when you don't sleep)
dataset = dataset[pd.notnull(dataset[args.label])]

# Remove all the columns with features that are too related sleep (potential labels) or wrong
# Date: wrong
# ID: wrong
dataset = dataset.drop("Date", axis=1)
dataset = dataset.drop("ID", axis=1)
for sleep_feature in potential_labels:
    dataset = dataset.drop(sleep_feature, axis=1)

# Convert to TensorFlow dataset
tf_dataset = tfdf.keras.pd_dataframe_to_tf_dataset(dataset, label=args.label)
The dataset is ready. We can just define a simple Classification and Regression model (Cart), train it, ans save the model locally.
model = tfdf.keras.CartModel()
model.fit(tf_dataset)
print(model.summary())
local_model_path = "trained_model"
model.save(local_model_path)
The model is now saved to the “trained_model” folder. The folder itself contains several files and folders, but being local to the container will disappear at the end of the execution.
We must copy the whole folder to the correct location (passed as model-destination CLI parameter). Cloud storage doesn’t have the concept of folders. The Google Cloud storage library we are using does not offer any helper function to copy a folder to a bucket. So we need to do this by ourselves, uploading every single file present in the local_model_path folder and its children.
from pathlib import Path

model_destination_folder = args.model_destination.replace(
    f"gs://{bucket.name}/", ""
)

files = glob(f"{local_model_path}/**", recursive=True)
for file in files:
    if Path(file).is_file():
        dest = Path(model_destination_folder) / Path(
            file.replace(f"{local_model_path}/", "")
        )
        blob = bucket.blob(dest.as_posix())

        blob.upload_from_filename(file)
Here we go. The training script (train.py) is ready. We can test it locally simulating the cloud environment by setting all the required environment variables, as follows:
export GOOGLE_APPLICATION_CREDENTIALS=path_of_service_account.json
export CLOUD_ML_PROJECT_ID=our-ml-project-id

python train.py --data-location gs://bucket_name/file.csv \
                --model-destination gs://bucket_name/destination/ \
                --label SleepEfficiency
Docker image creation & upload
Creating a docker image is trivial, but when working with the cloud there are a few things to keep in mind:
- You can’t give a random name to your image. It must follow a precise naming scheme that identifies: the region, the project ID, and the repository in the artifacts registry.
- You must configure your docker instance to make authenticated requests to Google Cloud, in the correct region.
The first thing to do is to create a docker repository in the artifact registry. It’s just a couple of clicks in the Google Cloud Console. By following this section of the tutorial we end up with a repository named “tfdf” inside the registry.
The region chosen is europe-west6 (for local proximity it is better to keep a region close to where we are, since we will push GB of images from our PC to the server in that region).
The cloud is ready to accept our images. We just need to create the Docker image and push it.
Although it is an official TensorFlow product, TF-DF is not available inside the prebuild containers for custom training, so we are going to create a Dockerfile that installs all the missing dependencies and thus TF-DF among the others.
We will copy inside the Docker image the training script and correctly set the application entry point. The entry point is the action to execute every time a container is executed. So, we are explicitly configuring our Docker image to be a training-only image (to train is the only thing every instance will do when spawned).
Let’s create the Dockerfile.
FROM tensorflow/tensorflow:2.13.0

WORKDIR /root

COPY requirements.txt .
COPY train.py .

RUN pip install -r requirements.txt

ENTRYPOINT ["python", "train.py"]
We are now ready to authenticate, build the image, and push it.
export REGION=europe-west6

# Configure Docker to make authenticated requests to the registry in our specified region
gcloud auth configure-docker $REGION-docker.pkg.dev

# Build the image. The format must be region.pkg.dev/project-id/repository/image-name:version
export REPOSITORY=tfdf
docker buildx build -f Dockerfile -t $REGION-docker.pkg.dev/$CLOUD_ML_PROJECT_ID/$REPOSITORY/cart:0.0.1 .
docker push $REGION-docker.pkg.dev/$CLOUD_ML_PROJECT_ID/$REPOSITORY/cart:0.0.1
Alright, we have uploaded a docker image containing a custom training script, that we can invoke from our Go application.
Create a Custom Training Job using Go
The setup, the modules to import and the environment variables are the same as used in the previous article. So, all the variables we don’t define here (like vaiEndpoint) should be considered to be already defined, and you can read the definition in that article.
Working with Vertex AI from Go follows a pattern:
- Create a client for your desired action.
- Create and populate a request, being sure to set all the required fields.
- Use the client to make the request.
- Wait for the request to complete.
Our action is the creation of a custom job, therefore we need a JobClient.
var customJobClient *vai.JobClient
if customJobClient, err = vai.NewJobClient(ctx, option.WithEndpoint(vaiEndpoint)); err != nil {
    return err
}
defer customJobClient.Close()
The creation of the Custom Job passes through the correct population of the CustomJob structure that contains several nested fields, all of them of extreme importance.
req := &vaipb.CreateCustomJobRequest{
    Parent: fmt.Sprintf("projects/%s/locations/%s", os.Getenv("VAI_PROJECT_ID"), os.Getenv("VAI_LOCATION")),
    CustomJob: &vaipb.CustomJob{
        DisplayName: "sleep-efficiency",
        JobSpec: &vaipb.CustomJobSpec{
            BaseOutputDirectory: &vaipb.GcsDestination{
                OutputUriPrefix: fmt.Sprintf("gs://%s/", bucketName),
            },
            WorkerPoolSpecs: []*vaipb.WorkerPoolSpec{
                {
                    Task: &vaipb.WorkerPoolSpec_ContainerSpec{
                        ContainerSpec: &vaipb.ContainerSpec{
                            ImageUri: fmt.Sprintf("%s-docker.pkg.dev/%s/tfdf/cart:0.0.1", os.Getenv("VAI_LOCATION"), os.Getenv("VAI_PROJECT_ID")),
                            Args: []string{
                                "--data-location",
                                fmt.Sprintf("gs://%s/%s", bucketName, csvOnBucket),
                                "--label",
                                targetColumn,
                            },
                            Env: []*vaipb.EnvVar{
                                {
                                    Name:  "CLOUD_ML_PROJECT_ID",
                                    Value: "our-ml-project-id",
                                },
                            },
                        },
                    },
                    ReplicaCount: 1,
                    MachineSpec: &vaipb.MachineSpec{
                        MachineType:      "n1-standard-4",
                        AcceleratorCount: 0,
                    },
                    DiskSpec: &vaipb.DiskSpec{
                        BootDiskType:   "pd-ssd",
                        BootDiskSizeGb: 100,
                    },
                },
            },
        },
    },
}
Okay, reading and understanding the content of this request is not immediate. So, for some unknown reasons every request requires to set the Parent field containing the information about the project ID and the location (region) in use.
After that, we must fill the JobSpec field with a pointer to a CustomJobSpec.
Setting a value to the BaseOutputDirectory.OutputUriPrefix field defines the environment variable AIP_MODEL_DIR inside the container - so we don’t have to pass the model-destination CLI argument, but we set it from here. The cloud always concatenates the /model path to the OutputUriPrefix value. So in our case, the destination folder of the trained model will be our-bucket-name/model.
The remaining field to set is WorkerPoolSpecs that’s a slice of pointers to WorkerPoolSpec. This structure allows us to define a worker inside a pool, where a worker is a machine with a certain configuration, running a certain docker image with certain parameters. We can set the Task field using a WorkerPoolSpec_ContainerSpec. This structure allows us to configure the cloud instance to create an instance of our docker image, passing the specified Args and environment variables.
We must also configure the hardware. In this case, we decided to use a “n1-standard-4” machine with no accelerations, an SSD disk of 100 GiB, and no replicas (this is the minimum configuration).
We have now reached the third point: we can use the client to make the request and wait for its completion.
var resp *vaipb.CustomJob
if resp, err = customJobClient.CreateCustomJob(ctx, req); err != nil {
    return err
}

customJobName := resp.GetName()

// Wait for the job to finish
for status := resp.GetState(); status != vaipb.JobState_JOB_STATE_SUCCEEDED &&
    status != vaipb.JobState_JOB_STATE_FAILED && status != vaipb.JobState_JOB_STATE_CANCELLED; status = resp.GetState() {

    if resp, err = customJobClient.GetCustomJob(ctx, &vaipb.GetCustomJobRequest{
        Name: customJobName,
    }); err != nil {
        return err
    }

    log.Println(resp.GetState())
    time.Sleep(500 * time.Millisecond)
}
The custom training process, which involves the instantiation of the hardware resources, the instantiation of the container, the execution of the training loop with the specified environment variables and CLI flags is a long process. For this reason, we wrote the above loop to poll the status of the job every 500 milliseconds until a termination status is reached.
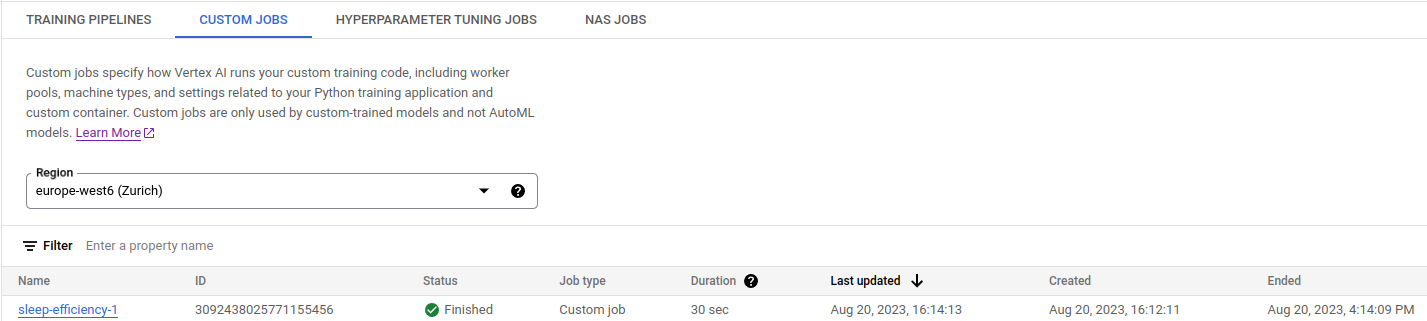
At the end of this process, in the Custom Jobs section of the Vertex AI console (Model Development => Training), we can find the information about the custom job training execution.
The docker container handled the upload to the desired location, so at the end of the process, we might expect to find the model in the correct location on the bucket. Unfortunately, this is not enough to have a model deployed. The deployment process requires several steps.
Deploying a custom model
Our custom model is uploaded into a bucket. The bucket however is not something Vertex AI can use directly. We need to upload the model to the model registry to make Vertex AI aware of the existence of our trained model.
var uploadOp *vai.UploadModelOperation
if uploadOp, err = modelClient.UploadModel(ctx, &vaipb.UploadModelRequest{
    Parent: fmt.Sprintf("projects/%s/locations/%s", os.Getenv("VAI_PROJECT_ID"), os.Getenv("VAI_LOCATION")),
    Model: &vaipb.Model{
        Name:        modelName,
        DisplayName: modelName,
        ContainerSpec: &vaipb.ModelContainerSpec{
            // use a prebuilt container, so we can create a shared pool of resources later
            ImageUri: "europe-docker.pkg.dev/vertex-ai/prediction/tf2-cpu.2-12:latest",
        },
        ArtifactUri: fmt.Sprintf("gs://%s/model", bucketName),
    },
}); err != nil {
    return err
}

var uploadModelResponse *vaipb.UploadModelResponse
if uploadModelResponse, err = uploadOp.Wait(ctx); err != nil {
    return err
}
As usual, we need to create a request and use a client to perform the request. This time the docker image to use is not our custom container (that after all, it always starts by training the model) but the official TensorFlow 2.12 container. The training script exported a SavedModel, and for the TensorFlow runtime a SavedModel is enough to execute the whole computation - we don’t even need TensorFlow decision forest installed to execute the inference.
This is a great advantage because by using a pre-built container we can create a shared pool of resources (a thing not possible using a custom image - for some reason), and this is extremely cost-effective if compared to having a dedicated machine per model.
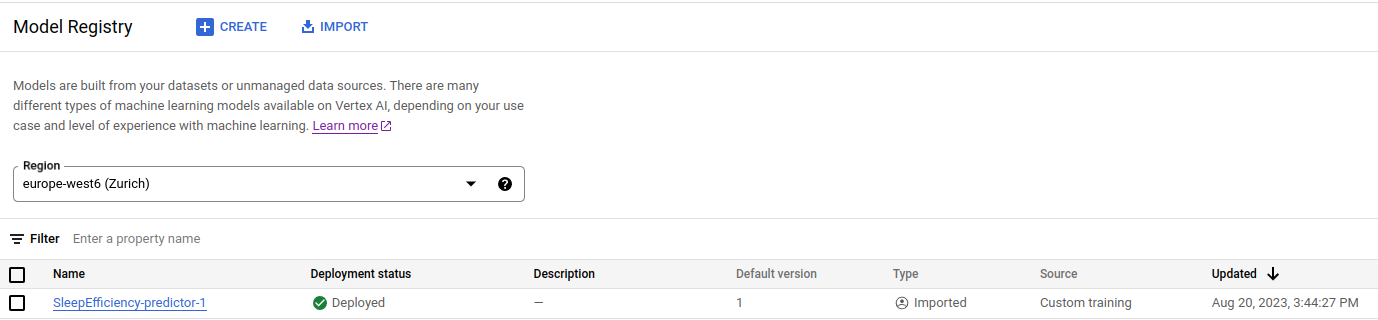
After the upload model request, we will find our model available in the Model Registry. So far, so good. However, this was the easy part.
Deploying means exposing the model capabilities as a server, and of course, on the cloud, you can have different types of hardware to use and different strategies. We could decide to have a dedicated machine for this model or create a deployment resource pool that we can use also for other similar models.
So, we have to create an endpoint. The endpoint should be created without any bound to a specific model. We will just give a name to the endpoint (the model name, just to be clear that we use this endpoint for that specific model) and create it.
var endpointClient *vai.EndpointClient
if endpointClient, err = vai.NewEndpointClient(ctx, option.WithEndpoint(vaiEndpoint)); err != nil {
    return err
}
defer endpointClient.Close()

var createEndpointOp *vai.CreateEndpointOperation
if createEndpointOp, err = endpointClient.CreateEndpoint(ctx, &vaipb.CreateEndpointRequest{
    Parent: fmt.Sprintf("projects/%s/locations/%s", os.Getenv("VAI_PROJECT_ID"), os.Getenv("VAI_LOCATION")),
    Endpoint: &vaipb.Endpoint{
        Name:        modelName,
        DisplayName: modelName,
    },
}); err != nil {
    return err
}

var endpoint *vaipb.Endpoint
if endpoint, err = createEndpointOp.Wait(ctx); err != nil {
    return err
}

fmt.Println("endpoint name:", endpoint.GetName())
After creating the endpoint we can get a meaningful name like projects/1064834149/locations/europe-west6/endpoints/606667790976 but it doesn’t contain the display name or the name we choose. So, honestly, it’s unclear how to get this information back. So we recommend storing the endpoint name somewhere.
Now, we must create the deployment resource pool. Once again, this is a bit of an unfortunate process because from the Vertex AI console is not easy to find the list of all the shared resource pools created (we haven’t found them yet), and for this reason, we cannot delete them manually or re-create them from the console.
So we have to use the DeploymentResourcePoolClient to search for the deployment resource pool, and if not found create it.
var resourcePoolClient *vai.DeploymentResourcePoolClient
if resourcePoolClient, err = vai.NewDeploymentResourcePoolClient(ctx, option.WithEndpoint(vaiEndpoint)); err != nil {
    return err
}
defer resourcePoolClient.Close()

deploymentResourcePoolId := "resource-pool"
var deploymentResourcePool *vaipb.DeploymentResourcePool = nil
iter := resourcePoolClient.ListDeploymentResourcePools(ctx, &vaipb.ListDeploymentResourcePoolsRequest{
    Parent: fmt.Sprintf("projects/%s/locations/%s", os.Getenv("VAI_PROJECT_ID"), os.Getenv("VAI_LOCATION")),
})
var item *vaipb.DeploymentResourcePool
for item, _ = iter.Next(); err == nil; item, err = iter.Next() {
    fmt.Println(item.GetName())
    if strings.Contains(item.GetName(), deploymentResourcePoolId) {
        deploymentResourcePool = item
        fmt.Printf("Found deployment resource pool %s\n", deploymentResourcePool.GetName())
        break
    }
}

if deploymentResourcePool == nil {
    fmt.Println("Creating a new deployment resource pool")
    // Create a deployment resource pool: FOR SHARED RESOURCES ONLY
    var createDeploymentResourcePoolOp *vai.CreateDeploymentResourcePoolOperation
    if createDeploymentResourcePoolOp, err = resourcePoolClient.CreateDeploymentResourcePool(ctx, &vaipb.CreateDeploymentResourcePoolRequest{
        Parent:                   fmt.Sprintf("projects/%s/locations/%s", os.Getenv("VAI_PROJECT_ID"), os.Getenv("VAI_LOCATION")),
        DeploymentResourcePoolId: deploymentResourcePoolId,
        DeploymentResourcePool: &vaipb.DeploymentResourcePool{
            DedicatedResources: &vaipb.DedicatedResources{
                MachineSpec: &vaipb.MachineSpec{
                    MachineType:      "n1-standard-4",
                    AcceleratorCount: 0,
                },
                MinReplicaCount: 1,
                MaxReplicaCount: 1,
            },
        },
    }); err != nil {
        return err
    }

    if deploymentResourcePool, err = createDeploymentResourcePoolOp.Wait(ctx); err != nil {
        return err
    }
    fmt.Println(deploymentResourcePool.GetName())
}
By creating a deployment resource pool we are creating a place in the cloud that we can use to execute computation. As we did during the training, we have specified the hardware we want and its characteristics. It should be noted that there’s no association between the endpoint, the deployment resource pool and the trained model yet.
The creation of the bound among these parts is done through the DeployModel operation.
var deployModelOp *vai.DeployModelOperation
if deployModelOp, err = endpointClient.DeployModel(ctx, &vaipb.DeployModelRequest{
    Endpoint: endpoint.GetName(),
    DeployedModel: &vaipb.DeployedModel{
        DisplayName: modelName,
        Model:       uploadModelResponse.GetModel(),
        //EnableContainerLogging: true, // enable logging only for custom containers
        PredictionResources: &vaipb.DeployedModel_SharedResources{
            SharedResources: deploymentResourcePool.GetName(),
        },
    },
}); err != nil {
    return err
}

if _, err = deployModelOp.Wait(ctx); err != nil {
    return err
}
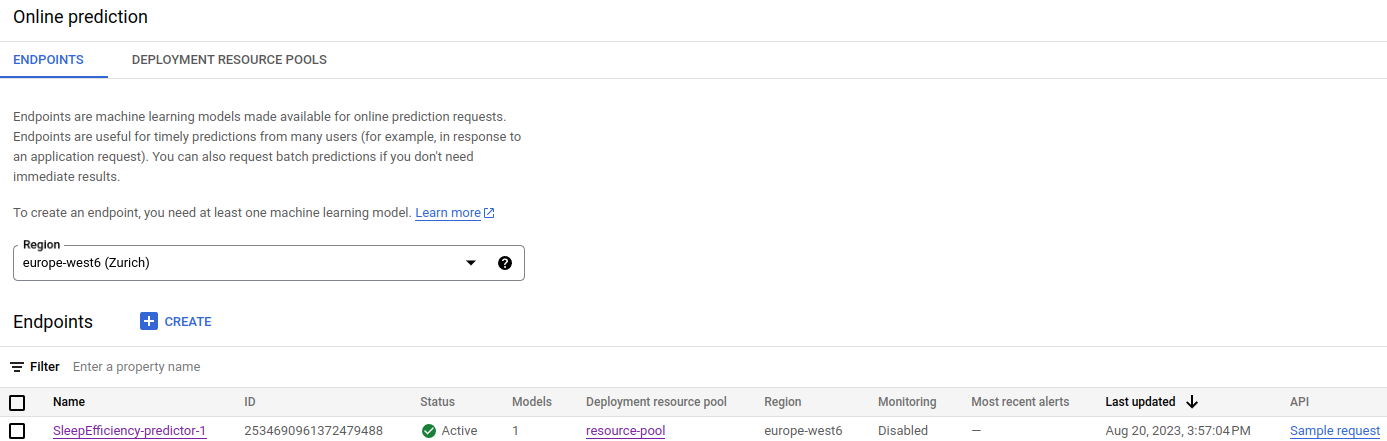
Once the deployment operation completes successfully, we can see in the Online Prediction section our model is deployed, active and using the resource pool previously created.
Here we go! We have gone zero to complete deployment of a custom model using Go with the help of Python and TensorFlow Decision Forests for the training and Docker for the containerization.
Summary
This article is packed with information, so here’s a 6-point recap that may help the reader have a clear path to follow while trying to replicate the steps presented.
- Model Training and Export:
- Train your machine learning model using your preferred framework (e.g., TensorFlow).
- Export the trained model in a format suitable for deployment (e.g., SavedModel).
- Upload Model to Cloud Storage:
- Store the exported model files (e.g., SavedModel files) in a cloud storage bucket, like Google Cloud Storage.
- Create a Model in the Model Registry:
- Use the cloud platform’s AI/ML service (e.g., Google Vertex AI) to create a model in the model registry.
- Specify the model name, its display name, and reference the location of the uploaded model files in the cloud storage bucket.
- Create an Endpoint:
- Create an endpoint for your model within the AI/ML service.
- Provide a name and display name for the endpoint.
- Define Deployment Resources:
- Configure the hardware resources and specifications needed for deploying your model.
- This includes specifying the machine type, accelerator type (if applicable), and replica counts.
- Deploy the Model:
- Deploy the model to the endpoint you created earlier.
- Associate the model with the deployment resources you defined.
Bonus: Use a model deployed on Vertex AI from a Go application
At this point it should be clear: create a client for the task (the Prediction), fill the request structure (PredictRequest) and use the client to make the request.
var predictionClient *vai.PredictionClient
if predictionClient, err = vai.NewPredictionClient(ctx, option.WithEndpoint(vaiEndpoint)); err != nil {
    return err
}
defer predictionClient.Close()
var instances []*structpb.Value
if instances, err = UserDataToPredictionInstance(allUserData); err != nil {
    return err
}

var predictResponse *vaipb.PredictResponse
if predictResponse, err = predictionClient.Predict(ctx, &vaipb.PredictRequest{
    Endpoint:  endpoint.GetName(),
    Instances: instances,
}); err != nil {
    return err
}
fmt.Println(predictResponse.GetPredictions())
The UserDataToPredictionInstance is not presented in this article, but it’s just the conversion from a Go structure to a *structpb.Value, format required to populate the PredictRequest.Instance field.
Conclusion
In this article, we presented a comprehensive walkthrough on how to solve a machine learning problem using a custom approach on Google Cloud’s Vertex AI platform. By departing from the AutoML pipeline discussed in a previous article, we demonstrated a more advanced approach that empowers experienced machine learning practitioners with full control over the entire pipeline, from model definition to training and deployment. Using a combination of Docker, Python, and TensorFlow (Decision Forest) for the custom training, we have been able to use Go to orchestrate both the training and the deployment process.
This article has been possible thanks to the Google ML Developer Programs team that supported this work by providing Google Cloud Credit.
For any feedback or comments, please use the Disqus form below - Thanks!