The Unreal Build Tool (UBT) official documentation explains how to integrate a third-party library into Unreal Engine projects in a very broad way without focusing on the real problems that are (very) likely to occur while integrating the library. Every Operating System (OS) has its own peculiarities when it comes to integrating third-party software, but apart from the OS, there are only 2 possible scenarios when it comes to the integration of a third-party library in a C++ software:
- The third-party library comes as a pre-built binary.
- The third-party library source code is available and we have to compile it.
There’s also a third scenario, that’s when the library is header-only, but the integration is very easy and there are no packaging problems (more or less…).
The focus of this article will be - in fact - on the packaging problems that are very likely to occur when integrating a third-party library into a C++ project and how - when possible! - to solve them. There will be a second article that we’ll focus on the source code available scenario.
Unreal Engine comes into play because it is a C++ cross-platform framework that adds some additional layers of complexity:
- It uses a non-standard build tool (UBT)
- Depending on the OS, the compilation toolchain to use is different (sometimes is fixed and Unreal provides it, some other times it uses the OS toolchain)
- On Linux, it uses
libc++instead oflibstdc++and this can cause lots of trouble when working with third-party libraries.
Thus, we can think about Unreal as the environment we use for simulating the scenarios presented above in a complex (and thus realistic) setting.
As previously introduced, every OS has its peculiarities when it comes to the integration of a third-party library - this article will focus on Linux.
The pre-built binary scenario
When a third-party library comes as a pre-built binary, we need to carefully look at all the details available regarding the compilation toolchain used. It’s of extreme importance to know the compiler used, the C++ standard, the standard library used and, of course, the target architecture. In fact, there’s no guarantee that binaries generated with a different toolchain are ABI compatible with the binaries produced by our toolchain even if the architecture matches.
To correctly simulate this scenario, we are going to create a library with different toolchains and see what happens when we link them to an Unreal Engine project.
Creating the library
The library just contains this single function:
// lib.cpp
#include <string>

std::string swap_concat(std::string &a, std::string &b) {
  std::string tmp{a};
  a = b;
  b = tmp;
  return a + b;
}
The function takes 2 strings, swaps them, creates a new string that’s the concatenation of the swapped strings and returns it. It’s not a case that this function uses std::string since, as we’ll see, strings are well-known for not being ABI compatible between libc++ and libstdc++.
Using clang we can change the C++ standard and the standard library used (that must be installed on the system) with ease. This simple bash script can generate the same shared library with the all the possible combinations of C++ standard (among 11, 14, 17) and standard library (among libc++ and libstdc++):
mkdir outs
for lib in libc++ libstdc++; do
    for std in 11 14 17; do
        clang++ -shared -std=c++$std -stdlib=$lib lib.cpp -o outs/$lib-clang++$std.so
    done
done
The clang version used is 13.0.1, the target is x86_64-pc-linux-gnu. Once executed the script, we end up with these 6 libraries:
libc++-clang++11.so libc++-clang++14.so libc++-clang++17.so libstdc++-clang++11.so libstdc++-clang++14.so libstdc++-clang++17.so
Moreover, since we are creating a pre-built library we need to provide our users the header to use together with our shared objects.
// lib.h
#include <string>
std::string swap_concat(std::string &a, std::string &b);
Alright, now that we have our pre-built library we can start the integration with Unreal Engine.
Creating an Unreal Plugin
Mixing the information from the third-party library integrations and the tutorial on the plugin creation we can quite easily create a plugin for our library. The correct way for integrating a third-party library in an Unreal Engine project is by creating a plugin that wraps the library functionality and completely hides the library.
The reason is pretty easy: Unreal Engine is a cross-platform framework and for being such it adds an abstraction layer over every data structure whose behavior may change from platform to platform. For instance, instead of directly using std::string the recommendation is to use FString. Almost every data structure available in the standard library has its Unreal counterpart.
Wrapping the third-party library behind a plugin is a clever idea because:
- The plugin’s public interface only uses Unreal types and, thus, has a perfect integration with the Unreal environment.
- If the library comes as a pre-built library, it’s possible to configure the UBT - through the
.Build.csfile - to include the correct third-party headers, and to link to the correct third-party library - depending on the target OS. -
Correctly organizing the third-party library in the
ThirdPartyfolder conceptually helps the developer in separating the interfaces (the plugin interface vs the third-party interface) highlighting the strong separation between the two parts. This separation is so strong, that there are 2 different.Build.csfiles- The build file of the external (
Type = ModuleType.External) module. The build file configures the build system for exposing to its only user (the plugin) only certain headers, together with the libraries to use at linking & run time. - The build file of the plugin. This build file configures the build system for using the public headers of the external module only in its Private parts. At the same time, it exposes in its Public folder the plugin’s interface. That interface will only contain Unreal data types.
- The build file of the external (
After this preamble that explains the reason why we are creating a plugin, let’s go straight to the code.
The Structure
The structure is enforced by the idea of having an external module for the third-party library and a module for the plugin.
Swap
├── Source
│   ├── Swap
│   │   ├── Private
│   │   │   └── Swap.cpp
│   │   ├── Public
│   │   │   └── Swap.h
│   │   └── Swap.Build.cs
│   └── ThirdParty
│       └── SwapLibrary
│           ├── include
│           │   └── lib.h
│           ├── linux
│           │   └── x64
│           │       ├── libc++-clang++11.so
│           │       ├── libc++-clang++14.so
│           │       ├── libc++-clang++17.so
│           │       ├── libstdc++-clang++11.so
│           │       ├── libstdc++-clang++14.so
│           │       └── libstdc++-clang++17.so
│           └── SwapLibrary.Build.cs
└── Swap.uplugin
SwapLibrary is our External module where we’ll place the pre-built libraries (all of them, for testing purposes), Swap instead is the plugin name. Let’s start by focusing on the latter.
The Plugin’s public headers
The idea is to expose the very same function offered by our library using only Unreal types.
IMPORTANT: do not expose the library headers. Hence, do NOT place an inclusion to the third-party library headers in any header present in the Public folder - otherwise, as a side effect, you’ll expose the library headers to the plugin’s users - and this is wrong!
Our Swap.h file looks like this:
#pragma once

#include "Containers/UnrealString.h"
#include "HAL/Platform.h"
#include "Modules/ModuleManager.h"

class SWAP_API FSwap : public IModuleInterface {
  public:
  // There's no need to override IModuleInterface
  // StartupModule & ShutdownModule methods.

  FString SwapConcat(FString &a, FString &b);
};
This is a public header that only contains Unreal types, and therefore it can be perfectly integrated into any Unreal project. The SwapConcat method is the Unreal wrapper of our third-party library swap_concat.
Focus: What is this $MODULE_API?
As already mentioned, Unreal Engine is a cross-platform framework that wraps every part of the code that can vary depending on the target OS.
The $MODULE_API (in our case SWAP_API) is a token that will be parsed by the Unreal Build Tool and mapped to the engine symbol (macro) DLLEXPORT. It’s possible to find this mapping in the Intermediate folder (generated by the UHT):
// Intermediate/[...]/Swap/Definitions.Swap.h
// [...]
#define UE_MODULE_NAME "Swap"
#define UE_PLUGIN_NAME "Swap"
#define SWAP_API DLLEXPORT
// [...]
The DLLEXPORT symbol is defined inside the engine in the correct header for the compilation target platform. In our case, we can find these lines
#define DLLEXPORT __attribute__((visibility("default")))
in the Engine/Source/Runtime/Core/Public/Unix/UnixPlatform.h header, while if we were on Windows, the definition would be
#define DLLEXPORT __declspec(dllexport)
in the Engine/Source/Runtime/Core/Public/Windows/WindowsPlatform.h header. The precompiler, thanks to the system-specific definitions, will include the correct header and thus use the correct definition for DLLEXPORT.
Unreal offers a HAL (Hardware Abstraction Layer) module that - as the name suggests - allows the users to don’t worry about these cross-platform nuances and write the code in a platform-agnostic way. The inclusion of HAL/Platform.h is required for being sure that the symbol DLLEXPORT is defined and, as a consequence, the correct platform-specific code will be used.
Now that we know that a new question naturally follows: what does the DLLEXPORT macro (thus the corresponding OS-specific implementation) do?
The UBT default behavior is to compile all the modules as libraries with all the symbols hidden (e.g. It’s like using gcc for creating a shared object, and passing the -fvisibility=hidden flag), which means that we need to manually choose which symbols to expose in our module.
The DLLEXPORT, thus, instructs the compiler to export the symbol that follows. In our case the FSwap class and its methods. This is an important thing to remember when creating modules in Unreal, otherwise, we end up with linking errors.
After this focus on the $module_API symbols, we can go back to our plugin implementation.
The plugin implementation
The implementation is the only part that can use the third-party library directly, thus, including the third-party library headers. The header inclusion, anyway, comes not for free. In fact, when including a third-party library we may find symbol clashes between Unreal and the library itself.
For this reason, Unreal offers some utilities that kinda restore the environment to the default state, so we can include the library freely.
#include "Swap.h"

#include "HAL/Platform.h"

#if PLATFORM_WINDOWS
#include "Windows/AllowWindowsPlatformTypes.h"
#include "Windows/WindowsHWrapper.h"
#endif

THIRD_PARTY_INCLUDES_START
#include "lib.h"
THIRD_PARTY_INCLUDES_END

#if PLATFORM_WINDOWS
#include "Windows/HideWindowsPlatformTypes.h"
#endif

#include "Modules/ModuleManager.h"

#include <string>

FString FSwap::SwapConcat(FString &a, FString &b) {
  std::string _a(TCHAR_TO_UTF8(*a));
  std::string _b(TCHAR_TO_UTF8(*b));

  std::string _ret = swap_concat(_a, _b);

  a = FString(UTF8_TO_TCHAR(_a.c_str()));
  b = FString(UTF8_TO_TCHAR(_b.c_str()));
  return a = FString(UTF8_TO_TCHAR(_ret.c_str()));
}

IMPLEMENT_MODULE(FSwap, Swap)
The various PLATFORM_* macros are all defined in the HAL/Platform.h header - these macros allow us to check the target platform and act accordingly. In particular, on Windows, there are clashes between system types and Unreal types. For this reason that boilerplate code that first enables and then disables the platform types is always required.
The THIRD_PARTY_INCLUDES_* macros, instead are enabling/disabling Unreal-specific compiler settings (things that Unreal treats as errors that can be warnings and vice versa). We can safely add the inclusion of the third-party library header only in this setting.
Then we can focus on the usage of the library: the FSwap::SwapConcat uses the swap_concat function and handles all the conversions required.
So far so good. We have created a plugin that correctly wraps the third-party library and only exposes - through a plugin - the library functionality using Unreal types.
The last part of the third-party integration is the effective third-party integration. So far we only worked using the header, but the pre-built library hasn’t come into play yet.
The build files
As mentioned at the beginning of this article, I decided to use Unreal Engine because it easily made us face problems that may come into play when creating complex cross-platform software. One of the additional difficulties is the usage of a custom build tool. Honestly speaking, the UBT is a pretty good build tool that makes it really easy to separate the responsibilities of the various modules, their dependencies, and the support for the cross-platform is straightforward.
For the implementation of our plugin we need to write 2 .Build.cs files:
SwapLibrary.Build.csthat will define ourExternalmodule, andSwap.Build.csthat’s the build file for the plugin, that will depend on theSwapLibrarymodule.
// SwapLibrary.Build.cs
using System.IO;
using UnrealBuildTool;

public class SwapLibrary : ModuleRules {
  public SwapLibrary(ReadOnlyTargetRules Target) : base(Target) {
    Type = ModuleType.External;

    PublicIncludePaths.Add(Path.Combine(ModuleDirectory, "include"));

    if (Target.Platform == UnrealTargetPlatform.Linux) {
      string libname = "libstdc++-clang++17.so";
      string path = Path.Combine(ModuleDirectory, "linux", "x64", libname);
      PublicAdditionalLibraries.Add(path);
      RuntimeDependencies.Add(path);
    }
  }
}
In the SwapLibrary.Build.cs file needs to follow our defined structure. Thus, we need to expose the library headers (PublicIncludePaths) so we can include lib.h from every module that will depend on SwapLibrary (hence only the Swap plugin), and depending on the target platform add the public dependency to our pre-built library.
I separated the libname variable from the path so we can easily switch library to see what happens when using the same library compiled in different settings.
// Swap.Build.cs
using UnrealBuildTool;

public class Swap : ModuleRules {
  public Swap(ReadOnlyTargetRules Target) : base(Target) {
    PCHUsage = ModuleRules.PCHUsageMode.UseExplicitOrSharedPCHs;

    PublicDependencyModuleNames.AddRange(new string[] {
      "Core",
    });

    PrivateDependencyModuleNames.AddRange(new string[] {
      "SwapLibrary",
    });
  }
}
The Swap.Build.cs file is straightforward. The UBT automatically adds the Private and Public folders to the (Public|Private)IncludePaths hence the UBT is already aware of what we want to expose publicly and what not. The only thing to add is the private dependency on our SwapLibrary so that those who use the plugin only indirectly depends on the third-party library. In this way the third-party library that won’t be publicly exposed to the user.
Alright, we have defined the content of our plugin. We can add it to every Unreal project (add it to the .uproject file, to the .Build.cs file of your module and to the .Target.cs file too) and see what happens when we compile and link it.
libstdc++, libc++, and Unreal Engine
In the SwapLibrary.Build.cs we decided to use the library compiled with libstdc++ and C++17.
string libname = "libstdc++-clang++17.so";
and that’s what happen when we compile the Swap module and link it with the SwapLibrary:
Link (lld) libUnrealEditor-Swap-Linux-DebugGame.so
ld.lld: error: undefined symbol:
        swap_concat(
            std::__1::basic_string<char, std::__1::char_traits<char>,
            std::__1::allocator<char> >&, std::__1::basic_string<char, std::__1::char_traits<char>, std::__1::allocator<char> >&)
>>> referenced by Swap.cpp:26 (Private/Swap.cpp:26)
>>>               Swap.cpp.o:(FSwap::SwapConcat(FString&, FString&))
clang++: error: linker command failed with exit code 1 (use -v to see invocation)
Why the linker (lld) can’t find the symbol swap_concat? As I introduced earlier there’s a well-known compatibility issue between std::string coming from libc++ and std::string coming from libstdc++.
Although the API is the very same (std::string) the linker sees a different symbol at linking time. In fact, looking carefully the linker is complaining about std::__1::basic_string and not about std::string or std::basic_string.
So what’s that ::__1? It’s an inline namespace used to achieve ABI versioning. This is a clever design choice that allows finding, at linking time, problems that will otherwise cause runtime errors. In particular, the data structure of std::string from libc++ completely differs from the data structure used in libcstd++ and thus they cannot be used interchangeably. The inline namespace mechanism made it possible to let the linker identify the ABI compatibility issues and prevent catastrophic crashes at runtime. Bet let’s understand why in our example the function that has been searched has this signature:
swap_concat(
    std::<b>__1</b>::basic_string<char, std::__1::char_traits<char>, std::__1::allocator<char> >&,
    std::<b>__1::</b>basic_string<char, std::__1::char_traits<char>, std::__1::allocator<char> >&)
Using nm we can list the symbols contained in object files. Thus, using nm together with grep and c++filt (for demangling) we can search for the swap_concat symbol in libstdc++-clang++17.so and read the signature in a human-readable way.
nm -D libstdc++-clang++11.so |grep swap_concat |c++filt

swap_concat(
    std::<b>__cxx11</b>::basic_string<char, std::char_traits<char>, std::allocator<char> >&,
    std::<b>__cxx11</b>::basic_string<char, std::char_traits<char>, std::allocator<char> >&)
The linker is looking for std::__1::basic_string while the library contains std::__cxx11::basic_string - a completely different symbol. The reason should be now pretty obvious: Unreal Engine uses libc++ and, thus, when we are using std::string in the FSwap::SwapConcat implementation, we are using a std::<b>__1</b>::basic_string and passing it to the swap_concat function. At compile time we have 0 problems because the library header is compatible (API compatibility) but thanks to the inline namespace mechanism the linker prevents us from linking completely different objects (ABI incompatible).
Thus, getting back to the main topic of this article. What can we do if the library is pre-built and we don’t have access to the source code?
Nothing
Precisely. There’s nothing we can do. The only failsafe option is asking the third-party library provider to re-compile the source code using a compatible toolchain. For being 100% sure that the third-party library is compatible with our toolchain, we should ask to use:
- The same compiler, at the same version.
- The same standard library.
- The same C++ standard.
Only in this way we are sure that we can compile, link and execute without any problem.
Moving on, we have compiled the library using a mix of C++ standard and standard libraries. We now know that every library compiled with libstdc++ is somehow harmful to use when using Unreal and the linking phase will fail if we use functions with parameters whose signature is - at ABI level - different.
To verify, we can just replace the libname value in SwapLibrary.Build.cs to one of the above libraries compiled with libc++. All of them will work.
The project structure
We can now define a simple project that uses the plugin:
ThirdPartyProject/
├── Plugins
│   └── Swap
├── Source
│   ├── ThirdPartyProject
│   │   ├── MyActor.cpp
│   │   ├── MyActor.h
│   │   ├── ThirdPartyProject.Build.cs
│   │   ├── ThirdPartyProject.cpp
│   │   ├── ThirdPartyProjectGameModeBase.h
│   │   └── ThirdPartyProject.h
│   ├── ThirdPartyProjectEditor.Target.cs
│   └── ThirdPartyProject.Target.cs
└── ThirdPartyProject.uproject
The project structure is the Unreal’s default. We’ll focus only on the plugin usage in this part of the article. We can define an Actor (MyActor) and use the plugin when it gets spawned.
note: You can have a look at the complete project here: galeone/ue-plugin-tutorial.
#include "MyActor.h"

#include "Engine/Engine.h"

#include "Swap.h"

// Sets default values
AMyActor::AMyActor() { PrimaryActorTick.bCanEverTick = false; }

// Called when the game starts or when spawned
void AMyActor::BeginPlay() {
  Super::BeginPlay();

  FSwap *plugin = FModuleManager::GetModulePtr<FSwap>("Swap");

  FString a(TEXT("man"));
  FString b(TEXT("bat"));
  const FString Message = plugin->SwapConcat(a, b);

  uint64 Key{1};
  float TimeToDisplay{10};
  FColor DisplayColor{FColor::White};

  GEngine->AddOnScreenDebugMessage(Key, TimeToDisplay, DisplayColor, Message);
}
The usage only involves Unreal types - and when we spawn an actor in the scene, here’s what happens:
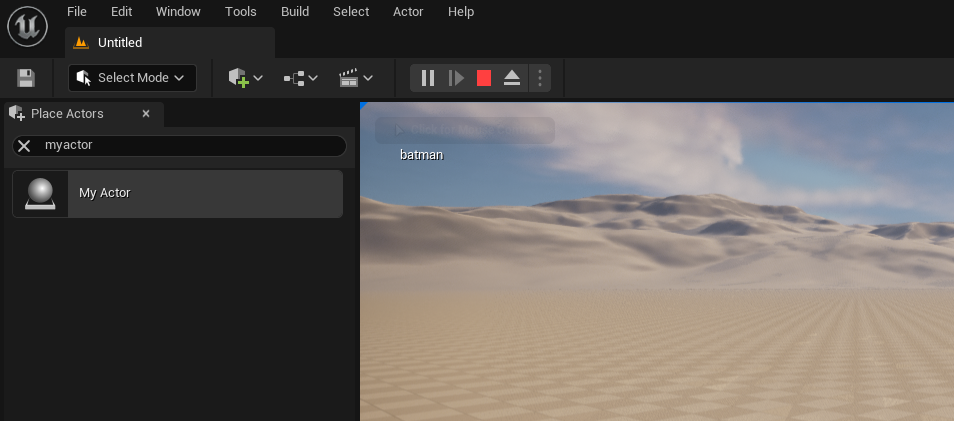
It works!
A simplified version
The problem of integrating a third-party library as a plugin inside Unreal Engine presented in this article is a very very simplified version of what’s likely to occur in a more realistic scenario.
This pre-built library that uses libstdc++ instead of libc++ and exposes in the API a symbol whose implementation differs among the two standard libraries allowed us to understand one of the problems that may occur when integrating a third-party library.
However, things can become way more complex than this especially if the third-party library is more complicated than this, and depends upon other libraries that the engine itself provides.
What could happen if the third-party library has among its dependencies zlib or libpng?. zlib and libpng are libraries that Unreal Engine provides and, thus, uses during the linking phase of the various modules - especially when packaging a project.
We’ll try to answer this question in the next article where we cover the source code available scenario. In that article, we’ll see what happens if we use the system toolchain when compiling the library and what happens when we use the Unreal toolchain also for compiling the third-party library.
Bonus
The whole article talked about std::string, but the problem is totally general. There’s no standard ABI in C++ and, thus, there’s no ABI compatibility for every structure in libc++ and libstdc++.
Let’s take this final example:
The library header.
//lib.h
#include <memory>

class B {
};

class A {
    std::unique_ptr<B> _p;
    public:
    A(std::unique_ptr<B>&&);
};
The library source code.
//lib.cpp
#include "lib.h"

A::A(std::unique_ptr<B>&& p) : _p(std::move(p)) {}
The library compilation (libc++):
clang -stdlib=libc++ lib.cpp -shared -o liblib.so
The main program
//main.cpp

#include "lib.h"
#include <memory>

int main() {
    std::unique_ptr<B> p = std::make_unique<B>();

    A x(std::move(p));
    return 0;
}
The working compilation (compile with libc++) and the execution
clang++ -stdlib=libc++ main.cpp -o main -L. -llib
LD_LIBRARY_PATH=. ./main
The failing linking (compile with libstdc++):
clang++ main.cpp -o main -L. -llib
/usr/bin/ld: /tmp/main-857110.o: in function `main':
main.cpp:(.text+0x3a): undefined reference to `A::A(std::unique_ptr<B, std::default_delete<B> >&&)'
clang-13: error: linker command failed with exit code 1 (use -v to see invocation)
I hope this last example - with zero Unreal Engine - helps understanding the ABI compatibility problem.