Continuous Integration (CI) is an essential step in the development pipeline of well-designed software infrastructure. The goal of CI is to automatize the boring stuff by letting the developers focusing on the code and, at the same time, helping them in producing good quality software.
Often, we read together two acronyms (and this article makes no exception) CI & CD. While CI always stands for Continuous Integration, CD has two different meanings:
- Continuous Delivery where a developer’s change is automatically bug-tested and uploaded to a repository, or
- Continuous Deployment where a developer’s change is automatically released to the production environment, where the customer can use this brand-new version.
In this article, I’m going to show you how to configure and use the CI/CD tool provided by GitLab to correctly manage the CI/CD pipeline of an Unreal Engine 4 (UE4) project that needs to work (and thus, to be tested) on 3 different platforms:
- Windows
- macOS
- Linux
In the following, “CD” will stand for Continuous Delivery - so I won’t cover the Deployment part.
Introduction to the GitLab CI/CD tool
GitLab is a complete DevOps platform: it offers us a complete CI/CD toolchain, an amazing issue tracking suite, and exposes in a user-friendly-way almost every Git’s feature.

The CI/CD toolchain is composed of 3 main parts:
- The
gitlab-ci.ymlfile that contains the configuration of the CI/CD pipeline. Using this YAML file we can configure the CI/CD behavior: what should happen on every commit or merge request, what should happen at scheduled times, and many many more. This file contains the commands to execute (a batch of commands is called “job”) on the specified runner. - GitLab Runners. A runner is a software able to receive from GitLab a job, execute it, and send back the result to GitLab. Several runners can (and should) run in parallel, allowing the whole infrastructure to scale. The execution of the job is delegated to an “executor”.
- The executor. During the configuration of the runner, we can specify what type of executor to use. In particular, it’s possible to use the machine where the runner is installed to run directly in its shell the commands (that’s the shell executor), or use Docker to execute the commands into a container, or even use a virtual machine or a Kubernetes cluster (for a complete reference see: https://docs.gitlab.com/runner/executors/).
The amazing thing is that GitLab Runner is a software written in Go: this means that it can run perfectly on our three target platforms: Windows, macOS, and Linux.
Moreover, installing it is trivial as explained in the documentation.
Executors for UE4 projects
Unreal Engine is a cross-platform game engine, quoting the official website:
Unreal Engine is the world’s most open and advanced real-time 3D creation tool. Continuously evolving to serve not only its original purpose as a state-of-the-art game engine, today it gives creators across industries the freedom and control to deliver cutting-edge content, interactive experiences, and immersive virtual worlds.
UE4 is really an amazing project, but this amazingness comes at a cost: it’s heavy. The engine itself, available on GitHub, weights ~132GB on Linux:
du -hs /opt/unreal-engine/
132G    /opt/unreal-engine/
Since our goal is to create an environment that contains the compiled engine (for our three target platforms) and use it inside our CI. Using a Docker executor it is perhaps the best possible solution.
Docker executor
As previously stated, one of the costs of using UE4 is its size: when we have enough resources this isn’t a problem (you need a good amount of storage and a lot of memory and CPU power to compile and use the engine), and it’s not a problem even when using Docker on Linux. However, building a Docker image containing UE4 on Windows is somehow a difficult and long process, because there is a well-know and unresolved issue about the creation of filesystem layers lager than 8 GiB.
Although there are well-known issues (only on Windows), using a Docker executor have a lot of advantages like:
- Spawning a container is a cheap operation.
- Every container is isolated.
- It is possible to scale the solution easily (easy to parallelize).
- Customizing/Creating a Dockerfile is easy.
Creating docker containers with unreal-engine inside is a challenge that Adam Rehn with his Unreal Containers amazingly faced.

The project, and Python package, ue4-docker contains all we need to create a docker image that we will later on use in our .gitlab-ci.yml file.
Using ue4-docker creating an image is so easy as:
REPO_URL="<set url here>"
BRANCH="<set branch here>"
ue4-docker build custom:4.25.3 -repo="$REPO_URL" -branch="$BRANCH" \
           --exclude debug \ # exclude debug symbols to reduce the image and workaround the windows issue
           --exclude templates \ # exclude the templates since we don't need them in our CI
           --exclude ddc # exclude DDC to speed up the image creation
The same command can be executed in a Linux and in a Windows machine. Personally, I prefer having a Linux machine that executes a docker container, instead of using a Windows machine to execute a docker container containing a Linux image (for performance reasons and to save time during the creation of the images too).
At the end of the execution of the ue4-docker command, we end up with a set of images ready to use like:
docker images | grep ue4

adamrehn/ue4-full                           4.25.3                        01562ee9c264        9 days ago          15.6GB
adamrehn/ue4-full                           4.25.3-opengl                 01562ee9c264        9 days ago          15.6GB
adamrehn/ue4-minimal                        4.25.3                        561beaae1f0f        9 days ago          14GB
adamrehn/ue4-minimal                        4.25.3-opengl                 561beaae1f0f        9 days ago          14GB
adamrehn/ue4-engine                         4.25.3                        717a019f5917        9 days ago          85.6GB
adamrehn/ue4-engine                         4.25.3-opengl                 717a019f5917        9 days ago          85.6GB
adamrehn/ue4-source                         4.25.3                        dce5e2cdbc65        9 days ago          54.7GB
adamrehn/ue4-source                         4.25.3-opengl                 dce5e2cdbc65        9 days ago          54.7GB
adamrehn/ue4-build-prerequisites            opengl                        ec75c0a656c0        7 months ago        584MB
A complete description of what is inside every image is available in the List of available container images page.
Using Docker we can cover the CI for the Linux and Windows platforms. macOS, instead, can’t run inside a container :( hence we have to use another executor.
Shell executor
The shell executor is just “the current machine”. Thus, we can install GitLab Runner on macOS and manually install all the dependencies that are, in our case, only unreal engine and the Xcode toolchain.
Differently from the Docker executor, the Shell executor has several disadvantages:
- No isolation at all.
- No native support for parallel and isolated executions.
- It doesn’t scale well.
- We have to clean up the dirt left by the operations we do in the CI (e.g. temporary files).
The only advantage we have is the simplicity of installation: we just have to install UE4 on our machine and we are ready to go.
Supposing to have Unreal Engine already installed (the setup on Mac, Linux, Windows is straightforward; it’s just a matter of following the guide), the only thing we need to do is to install another Python tool created by Adam Rehn: ue4cli.
This Python package implements a command-line tool called ue4: this tool simplifies the invocation/usage of the UE4 toolchain and, perhaps more importantly, it unifies the interface we have to use on different platforms.
The tool is installed into the ue4-full images and that’s the reason we’re going to use these images in our gitlab-ci.yml file.
The CI/CD pipeline
As introduced at the beginning of the article, after setting up the runners and the executor, we are ready to describe the CI/CD pipeline in the .gitlab-ci.yml file.
Continuous Integration
Let’s start with the automatization of the boring stuff, we need to find a way to automatically answer these questions:
- Is the code following the code style / required formatting?
- Does the code I want to merge compile correctly on every platform?
- Am I introducing regressions?
To answer all these questions, and be ready for the continuous delivery stuff, we need to define the variables and the stages (of the pipeline) we plan to execute.
variables:
    GIT_SUBMODULE_STRATEGY: "recursive"
    GIT_STRATEGY: "fetch"
    GIT_CHECKOUT: "true"
    GIT_SSL_NO_VERIFY: "1"
    GET_SOURCES_ATTEMPTS: "10"

stages:
    - static-analysis
    - build
    - tests
    - package
- The static-analysis stage will contain the jobs related to the source code analysis. The checks for the source code formatting (the only one presented in this article) and other checks related to the analysis of the source code itself.
- The build stage will contain the jobs that answer question 2.
- The test stage contains the execution of the test cases (because every unreal project uses the unreal test suite - isn’t it?)
- The package stage contains the continuous delivery part of the pipeline.
Static Analysis
Every C++ project should follow a code style. This CI job uses clang-format and dos2unix to check if every committed file has the correct encoding (we need UTF-8 encoded files to be sure that every compiler on every platform can read them well) and follows the style rules present in the .clang-format file that should be present into every project :)
clang-format:
    image: alpine
    stage: static-analysis
    variables:
        GIT_LFS_SKIP_SMUDGE: "1"
    # empty dependencies = do not need artifacts from previous stages
    dependencies: []
    script:
        - apk update && apk add clang git bash dos2unix
        - exclude=$(for d in $(git config --file .gitmodules --get-regexp path | awk '{ print $2 }'); do echo "-not \( -path ./$d -prune \) "; done)
        - A="find . $exclude -iname *.h -o -iname *.c -o -iname *.cpp -o -iname *.hpp -o -iname *.cc"
        - B=$(echo -e "$A" | tr -d '\n')
        - C="$B | xargs dos2unix"
        - bash -c "eval '$C'" || true
        - bash -c "if (( $(git ls-files -m |wc -l) > 0 )); then git ls-files -m; echo 'WRONG encoding or line feed'; exit 1; fi"
        - A="$B | xargs clang-format -style=file -i"
        - bash -c "eval '$A'" || true
        - bash -c "if (( $(git ls-files -m |wc -l) > 0 )); then git ls-files -m; exit 1; fi"
    # Select runner
    tags:
        - linux
        - docker
Perhaps the bash scripting is a big heavy to follow, but it does its work well. In short, we install clang, git, bash, and dos2unix on an alpine container, and then we search for all the .cpp or .hpp or .h or .cc files in the repository, but not in its submodules, and we first use dos2unix to check the encoding of all the files and in case there is one not in UTF-8, we print them and exit. After that we invoke the clang-format -i -style=file $file on every file. If a file changes, it means that it has been committed without being properly formatted, thus we exit with failure after printing the list of the fails wrongly formatted.
Al the “mess” with bash -c $command || true is because of some well-know issue of the GitLab YAML parser + its execution of the parsed command into the container.
Note how using the tags we are able to select the runners. During the runner setup, in fact, it’s possible to assign tags to the runners in order to identify them. I tagged with the linux and docker tag a runner that uses a docker executor on a Linux host.
Compilation
On every merge request, we want to be sure that the code the developer is writing at least compiles on every platform. After setting up the infrastructure, doing this is really straightforward.
compile-development-linux:
    image: adamrehn/ue4-full:4.25.3
    stage: build
    script:
        - ue4 build Development
    only:
        - merge_requests
    # Select runner
    tags:
        - linux
        - docker
        - ue4

compile-development-windows:
    image: adamrehn/ue4-full:4.25.3
    stage: build
    script:
        - ue4 build Development
    only:
        - merge_requests
    # Select runner
    tags:
        - windows
        - docker
        - ue4
    # Allow failre because the windows build machine is slow
    # and sometimes we want to manual delete this job
    # and only keep the linux (fast) job running
    allow_failure: true

compile-development-mac:
    stage: build
    script:
        - ue4 clean || true
        - ue4 build Development
    only:
        - merge_requests
    # Select runner
    tags:
        - mac
        - shell
        - ue4
The Windows and Linux jobs are the same: I only changed the runner using the tags.
On macOS, instead, I have to first clean-up the mess left by previous compilation - if any (with ue4 clean || true), after that thanks to the ue4cli the command used is the same used on every other platform.
Tests
Tests in the CI can run only on Linux - if the application you’re developing requires user interaction or if you’re using CEF (Chromium Embedded Framework) especially. In fact, in Linux we have Xvfb (X virtual framebuffer) that’s a display server implementing the X11 display server protocol.
In fact, we can easily customize the Dockerfile of the Linux container to invoke Xvfb in the ENTRYPOINT and send it to the background. In this way, every container we spawn has its own display running and all the tests written using the Automation Driver can work easily, even if there isn’t a physical display present.
To enable this, it’s just a matter of adding to the start.sh script invoked in the ENTRYPOINT the invocation of Xvfb.
#!/usr/bin/env bash

/usr/bin/Xvfb :99 -screen 0 1024x768x24 -ac +extension GLX +render -noreset -nolisten unix &
export DISPLAY=:99
/usr/bin/env bash
Once rebuilt the Linux containers, we are ready to define the test job.
test:
    stage: tests
    image: adamrehn/ue4-full:4.25.3
    script:
        # The container contains a virtual display (Xvfb)
        # running, and the DISPLAY variable is already set
        - ue4 build Development # first build the program (in editor)
        - ue4 run -ExecCmds="automation RunTests Now MODULE+TO+TEST+PLUS+SEPARATED; quit" -buildmachine -forcelogflush -unattended -nopause -nosplash -log -nullrhi | grep -v "empty engine version" > output.log || true
        - cat output.log | grep "Test Completed"
        - if (!(grep -q "Test Completed. Result={Fail" output.log) && (grep -q "TEST COMPLETE. EXIT CODE" output.log)); then exit 0; fi
        - exit 1
    only:
        - merge_requests
    artifacts:
        paths:
            - output.log
        when: always
    # Select runner
    tags:
        - linux
        - docker
        - ue4
This job also produces an output.log file that can be inspected in case of crashes of the test suite (it might happen).
NOTE: ue4cli offers the ue4 test command, but when there is no display connected it doesn’t work and we have to use the custom command line you can see above in the ue4 run invocation.
Continuous Delivery
We want to give the developers the possibility of downloading a packaged version of the application, in both shipping (optimized) and debug (with debug symbols, check, ensure, and so on) version and at the same time set up the gitlab-ci.yml file in order to generate automatically builds at fixed time intervals (this option can be configured by Gitlab itself using the web interface).
For this reason, instead of directly defining the jobs we define templates. These templates will be then used for both the manual and the scheduled jobs.
# Linux
.package-template-shipping-linux:
    image: adamrehn/ue4-full:4.25.3
    stage: package
    variables:
        GIT_STRATEGY: "clone"
    script:
        - ue4 package
        - mv dist/LinuxNoEditor .
    artifacts:
        name: "app_$CI_COMMIT_SHORT_SHA"
        paths:
            - LinuxNoEditor/*
    # Select runner
    tags:
        - linux
        - docker
        - ue4
    interruptible: true

.package-template-development-linux:
    image: adamrehn/ue4-full:4.25.3
    stage: package
    variables:
        GIT_STRATEGY: "clone"
    script:
        - ue4 package Development
        - mv dist/LinuxNoEditor .
    artifacts:
        name: "app_dev_$CI_COMMIT_SHORT_SHA"
        paths:
            - LinuxNoEditor/*
    # Select runner
    tags:
        - linux
        - docker
        - ue4
    interruptible: true

# macOS

.package-template-shipping-mac:
    stage: package
    variables:
        GIT_STRATEGY: "clone"
    script:
        - LC_ALL="C" ue4 package
        - mv dist/MacNoEditor .
    artifacts:
        name: "app_$CI_COMMIT_SHORT_SHA"
        paths:
            - MacNoEditor/*
    # Select runner
    tags:
        - mac
        - shell
        - ue4
    interruptible: true

.package-template-development-mac:
    stage: package
    variables:
        GIT_STRATEGY: "clone"
    script:
        - LC_ALL="C" ue4 package Development
        - mv dist/MacNoEditor .
    artifacts:
        name: "app_dev_$CI_COMMIT_SHORT_SHA"
        paths:
            - MacNoEditor/*
    # Select runner
    tags:
        - mac
        - shell
        - ue4
    interruptible: true

# Windows

.package-template-shipping-windows:
    image: adamrehn/ue4-full:4.25.3-cef-fix
    stage: package
    variables:
        GIT_STRATEGY: "clone"
    script:
        - ue4 package
        - mv dist/WindowsNoEditor .
    artifacts:
        name: "app_$CI_COMMIT_SHORT_SHA"
        paths:
            - WindowsNoEditor/*
    # Select runner
    tags:
        - windows
        - docker
        - ue4
    interruptible: true

.package-template-development-windows:
    image: adamrehn/ue4-full:4.25.3-cef-fix
    stage: package
    variables:
        GIT_STRATEGY: "clone"
    script:
        - ue4 package Development
        - mv dist/WindowsNoEditor .
    artifacts:
        name: "app_dev_$CI_COMMIT_SHORT_SHA"
        paths:
            - WindowsNoEditor/*
    # Select runner
    tags:
        - windows
        - docker
        - ue4
    interruptible: true
As usual, the code for the Windows and Linux (where we use the docker executors) is identical, while for macOS we have to take care of the dirt (and of another strange requirement about the needs for the “C” locale).
Now that we have the templates defined, we can define the jobs. One type of job will be executed only by the “scheduled” tasks (e.g. we can then have nightly builds in this way), the other one is manual and let the developer the freedom to press a button, trigger the build and have the artifact ready for download at the end.
# Linux

package-shipping-linux:
    extends: .package-template-shipping-linux
    when: manual
    except:
        - schedules

package-development-linux:
    extends: .package-template-development-linux
    when: manual
    except:
        - schedules

scheduled-package-shipping-linux:
    extends: .package-template-shipping-linux
    only:
        - schedules

scheduled-package-development-linux:
    extends: .package-template-development-linux
    only:
        - schedules

# macOS
package-shipping-mac:
    extends: .package-template-shipping-mac
    when: manual
    except:
        - schedules

package-development-mac:
    extends: .package-template-development-mac
    when: manual
    except:
        - schedules

scheduled-package-shipping-mac:
    extends: .package-template-shipping-mac
    only:
        - schedules

scheduled-package-development-mac:
    extends: .package-template-development-mac
    only:
        - schedules

# Windows

package-shipping-windows:
    extends: .package-template-shipping-windows
    when: manual
    except:
        - schedules

package-development-windows:
    extends: .package-template-development-windows
    when: manual
    except:
        - schedules

scheduled-package-shipping-windows:
    extends: .package-template-shipping-windows
    only:
        - schedules

scheduled-package-development-windows:
    extends: .package-template-development-windows
    only:
        - schedules
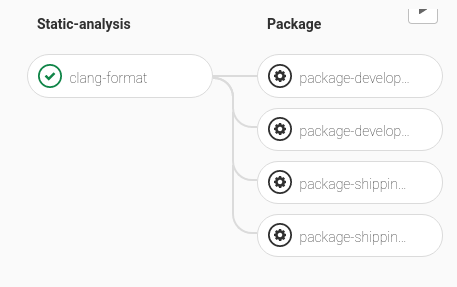
In this way, we defined a CI pipeline that looks like this for every commit (in the image there is the support only for 2 OS).
and the same pipeline gets more complicated (adding the testing phase) when the pipeline is triggered by a merge request.
Moreover, configuring GitLab to invoke the CI at scheduled time we can wake up every morning having a ready-to-test nightly build.
Conclusion
It requires some (good) sysadmin skill to set up the whole infrastructure for the CI/CD of an Unreal Engine-based software, but it is worth it. :)
Disclosure
I initially wrote this article for the Zuru Tech Italy blog and I cross-posted it here.